

This post is the first on Root Cellars Rock by the wonderful Lisa & Steve McBride who have been sharing their knowledge and experiences as they cultivate a homesteading lifestyle in St. John's, learning about many things DIY and sustainable. We hope to share more from them in the future! This information was recently distributed as a information packet at a FEASt workshop the McBrides hosted at the St. John's Farmers' Market. Most of the photos are courtesy of Lisa McBride Photography, except where noted.
Making Your Own Homemade Maple Syrup in Newfoundland
Intro
Maple syrup conjures up images of towering arboretums in places like Quebec or Vermont, but it’s a little known secret that the rugged and hardy maple trees of Newfoundland make darn fine maple syrup. With nothing more than a half dozen maple trees, some old salt beef containers and a handful of 25 cent metal tree taps, you’re good to go and can expect to end up with over a dozen bottles of hand made maple syrup. Our harvest of 70 bottles for 2012 will provide us with all the syrup we need for our pancakes, maple grilled salmon, and maple glazed carrots (etc, etc...) all year long!
The tapping process takes about 5% of the raw sap from the tree, this process occurs in late Winter as the tree sends raw sap up to the branches to create leaf buds. The small tap hole will heal over by the next Winter, so making your own maple syrup is both local and fully sustainable & renewable – some of the maple groves in Quebec are centuries old!
Collecting and emptying the 30 or so taps we installed in 2012 took us around an hour and a half a day. The good news is - the sap only runs when it’s above freezing. So on all those blustery March mornings when it’s blowing snow outside, you’re off the hook! You can plan on emptying your buckets 3-4 times a week, but this may be every other day, or it may be consecutively, this is weather and temperature dependent.

Supplies
- A portable drill or hand drill, with a 7/16-inch drill bit, to drill your tap-holes
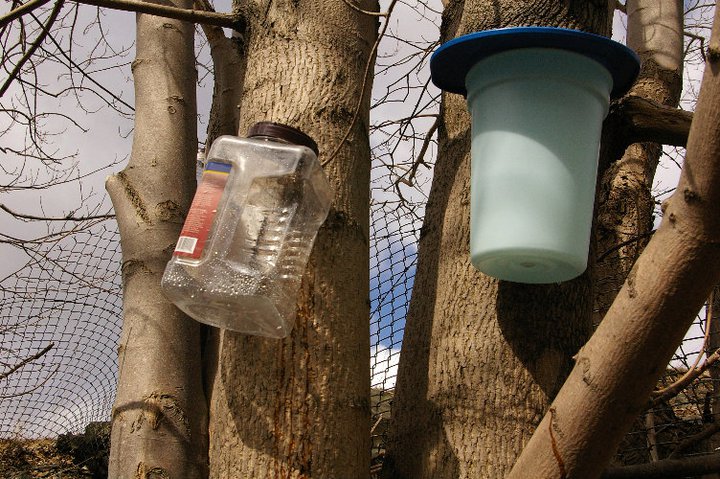
- Buckets are required for catching sap (2-4L in size)
- Metal tree taps (we bought ours on eBay for 25 cents each). Don’t use plastic taps – the high winds here will blow them right out of the trees!
- A hammer is necessary to drive the taps in
- You can also use a metal slug (called a spile driver) to drive the taps in easier and without the risk of bending them – although as long as you are careful this is not necessary
- For boiling down the sap you will need a candy thermometer (available at bulk barn, etc)
- A large stock pot
- Jam jars or fancy bottles for storing
- You will also need felt for filtering your syrup
The Trees
Identify the trees you want to tap in the summer or fall, while the leaves are on the trees and easy to identify. If you are ever unsure of tree variety/species while you are out drilling, just poke around at the base of the tree. There will be some dried leaves from the fall that you can unfurl and use to ID. With only a little bit of practice it is easy to tell the four main maple species apart just by looking at the bark, which makes it easy year-round.
You can collect maple sap for syrupmaking from ANY AND ALL maple trees. So, if you’re not confident in telling trees apart, it doesn’t really matter much. Sugar maples (Acer saccharum) are the best choice since they contain about 50% more sugar by volume and thus considerably less sap is needed per bottle, reducing boil time (see leaf example pictures). Red Maple (Acer rubrum, a softwood) is a prolific producer here in Newfoundland since it actually flows at temperatures a little bit below freezing, so your red maples will often run on chilly February days while the rest of your taps are frozen shut. Silver maples (Acer saccharinum) are good producers but we have rarely seen these in St. John’s, and they rarely get large enough to tap – the wood is quite brittle and it doesn’t seem to stand up to the wind storms as strongly as the other maples do. If you see an Ash-Leafed Maple (Box Elder, Acer negundo), let us know – we haven’t seen any. They are apparently quite common in Manitoba.
The Norwegian Maple (Norway Maple, Acer platanoides) seems to be the most common in St John’s (it is invasive) and it commonly occupies empty lots and streetsides, since it spreads and reproduces faster than our indigenous maples– this is our third choice but due to availability and size we end up tapping more Norwegians than anything else.
So, to recap, if possible prioritize trees for tapping in this order: Sugar> Red> Norwegian> Silver> Box Elder.

Installing the Taps

Drill your tap holes and install your taps in late February. There is no specific date, it is temperature related. As soon as there are two days in a row that are above freezing, it’s time. This year our install date was Feb 22.
To install your taps, drill into the tree an inch and a half (4cm or so), on about a 20 degree upward angle, so the sap can flow downwards out the spout. You’ll notice the taphole become wet, clear out the wood shavings from the centre of the hole and hammer tap in. If you are tapping a tree you tapped last year, locate the new tap hole 6 inches away from last year’s tap hole.


The Sap

Contrary to what you might expect when you think about tree sap as being amber and sticky, maple sap is a clear liquid that is basically almost entirely water. It flows from the roots of the tree to the branches of the tree, in order for the tree to grow leaf buds in the Spring. The flow can literally gush out of the trees like a dripping faucet, or it can drip very slowly – this depends on a number of factors, which are (in order of relative importance): temperature, hours/intensity of sunlight, air pressure, water pressure (if by a river/stream), and wind pressure. The primary factor that determines whether sap flows or not on any given day is whether it is above freezing or not – below freezing nights and warm temperatures during the day mean a heavy sap flow. Sap is good to use for syrupmaking up until the buds are about to open – bad sap has fermented slightly and is cloudy and whitish looking. When you see cloudy sap, its time to pull your taps.
Newfoundland Syrupmaking vs. The Mainland
There are several differences between syrupmaking in Newfoundland as compared to the mainland
Maple sap flows out from the trees in late winter, when the daily temperature is above freezing and the nightly temperatures are below freezing. On the mainland, this process takes place over 2-3 weeks, or even less – the 2012 season in Ontario was only ten days long! The ‘freeze thaw’ cycle of St John’s means the same sapflow process takes quite a bit longer, in our experience over a period of 4-5 weeks instead.
Newfoundland trees are also quite a bit smaller than their mainland counterparts – this means the yield is a little lower. You can expect to produce 2 bottles of syrup (500ml) per tree per season compared to 3 if you are tapping trees on the mainland.
Interestingly, our older, local trees here often split at the base into two, three, or even up to seven main trunks, due to the shallow soilbase and very high winds. So, when measuring a tree to see if it is of ‘tappable’ size (10 inches in diameter), find the widest part of the trunk. Sometimes this is very close to the ground or even at ground level before the trunk splits. The best place for your taps is south facing when possible, to maximize sunlight. Choose a spot a few inches below one of the larger branches on the tree, at least three feet off the ground. Keep in mind that when you begin tapping, there is probably several feet of snowpack under you. Don’t tap too high, or you might find your taps will be eight feet off the ground when the snow melts!
Another unique phenomenon to NL that can affect your sapflow are ICEBERGS. The change of pressure that results when an iceberg is parked outside of the harbour has a surprising affect on your flow rate. High wind pressure combined with the right temperature will also result in an unusually large sap flow.
Processing the Syrup

Maple sap is almost entirely water (96%!), along with nutrient minerals such as zinc, iron, calcium, manganese, potassium and magnesium, and 2-3% sugar. Maple sap on its own is slightly sweet, but otherwise watery, it’s quite delicious on a warm sunny day in March. Native North Americans, and early European settlers, drew maple sap directly from the trees in the early Spring as a subsistence food, as it offered key vitamins missing in a winter diet. Maple syrup is what remains after you boil off a majority of the water (the vitamins all remain, unlike Aunt Jemima, which is simply coloured, salted sugar syrup).
So, to get syrup, 90% or more of what you collect has to go up in steam. This involves a lot of boiling down, and the traditional thing to do is to do it outside, with a woodfire. Being urbanites, we boil ours down on the stove. Be warned! This creates a lot (a lot!) of steam, so you’ll need a fan and an open window, and probably a rag to wipe up any condensation. Overall, this is a manageable problem.
Processing the syrup can be done once a week, or even twice a week during the peak of the flow season. Save up your accumulated sapflow in a large food grade barrel/ cooler/ tank, in the fridge or somewhere shady outside, until you’re ready to boil down. Raw sap is a little bit like fruit juice – it’ll spoil if it’s left too long or if it gets too warm for too long, but since it’s quite cold out still you can leave your sap outside, in a place away from the sun.
Fill up a large stockpot with clear sap, and get it boiling. Keep adding sap to the pot as the water evaporates. The boiling will reduce any impurities in the sap as well as leaving calcium deposits. Skim the foam off the top every so often. The boil down process typically takes a few hours, but in the early stages the pot can be left unattended for 20-30 minutes at a time while you putter about. As you boil your maple sap it will gradually colour, becoming amber as the water evaporates off and the sugar content concentrates and carmelizes.

When the temperature rises to 105°C, it is time to stay close to your pot, the temperature climbs faster towards the end of the boildown and you do NOT want to have to clean hardened sap off your stovetop! The correct temperature for reducing to maple syrup is a consistent 107°C on a candy thermometer, although this can be adjusted by a degree either side once you have made maple syrup and have decided to try for thicker, or thinner, syrup. Filter the syrup through a felt sleeve (preferably, but a coffee filter would work too), and bottle. These temperatures are set for sea level, if you are significantly above sea level you may wish to determine the boiling point of water at your altitude before processing, since water boils at a different temperature as altitude increases.
Once the syrup has reached 107 degrees and has been filtered, it simply needs to be brought back to a boil in order to sterilize the syrup for bottling. Unlike before, with the water mostly evaporated, the second boil takes mere minutes. Bottled syrup is shelf stable and can be stored in the same fashion as jams – refrigerate after opening. However there is one key difference – in the unlikely event that your syrup is left out in the open and develops mold, you can simply scrape off the mold, bring the syrup back up to 107°, and rebottle...good as new! If you’re anything like us, though, a bottle never lasts long enough to go bad.

Home processing is not as fine as commercial processing, and it is very normal to see some slight sediment along the bottom of your maple syrup a few months later – this is ‘sugar sand’, which is a mixture of crystallized sugar and calcium deposits – it is sweet tasting but a bit gritty.
If your syrup is boiled too thick, or sits for too long, large crystalline sugar cubes may form on the bottom of the bottle – once the bottle is done, these maple sugar cubes can be removed, and make a divine addition to a range of baked goods (or sprinkled on top of salmon, for instance).
At the beginning of the maple syrup season you will notice your finished product will be light gold (or lighter) in color. The more clear your syrup, the earlier in season it was processed, and the higher the grade. As the season goes on the syrup turns darker amber. Professional syrup bottlers use a four-point colour chart, and colour determines grade, with clear and light coloured syrup being preferred. Compared to making syrup on the mainland, you can expect a LOT of very light coloured syrup from our trees. Despite our expecting ‘dark amber’ towards the end of our runs as we had read, we have yet to see any of our syrup turn this dark. All of the syrup is equally delicious, but you may find that lighter and darker syrups have their appropriate uses, for example lighter syrup, being a bit more delicate, goes better with granola and yogurt, from experience.

Frequently Asked Questions
Q: Do people ever mess with your sap buckets?
A: We get asked this question by literally every single person we interact with while we are out on our ‘maplewalks’, and the answer is no – we’ve probably emptied our buckets, collectively, over a thousand times since we began doing this as a hobby and we have only had a single instance of bucket contamination. Our buckets are almost all out in public, along public roads and trails, and the only thing we tend to meet on a daily basis is people’s curiosity!!
Q: Do you sell your syrup?
A: We make enough syrup for our own use and we typically have a surplus available – although, since this is a sustainability hobby, the extra bottles are, when available, up for trade. We would happily exchange our surplus, when available, for homestead goods/gardenstuffs/etc. If your schedule or situation doesn’t allow for you to make your own maple syrup, and you still want some to enjoy, consider approaching us for some ‘tradesies’!
Q: Did you have any previous experience before attempting this?
A: Zip, zero, zilch. We came into this not knowing anything about maple trees, (Or Newfoundland for that matter, who are we kidding) and once we established how to tap the trees in a sustainable and harm-free manner, we jumped in with both feet! So you can too.
Q: How much does it cost to get started?
A: You can buy a beginner’s kit from websites on the mainland for around $100. Assuming you already possess the basic tools required, all you need are the taps (25cents/ea) and the buckets, which you can probably find for free. The largest expense is a candy thermometer, if you don’t have one, which runs $12 or so.
Q: You boil your sap inside, on the stove. How much did that add to your power bill?
A: We estimated that, based on our consumption patterns and the power use of the stove for the time it was in use, that we spent an extra $25 on our hydro during syrup season. For 70 bottles, this works out to around 30 cents a bottle. If you can cut down a birch tree or two (or tidy up your maple grove), you could probably do the whole thing outside over a fire. In the old days, folks used to make little wooden lean-tos to shelter in during the boildown, these of course were called ‘sugar shacks’.
Q: Making syrup was fun. What else can I do with my maple sap?
A: The wonderful world of maplecandying awaits those who get this far – we made our first maple candies and maple taffy this year (Spring 2012). The process can be quite complex and as creative as you make it, but at its easiest, you simply overboil fresh maple syrup, to 112-113 degrees instead of 107, and then pour it out on the snow. The syrup cools and thickens, instantaneously, into maple taffy and can be picked up and eaten – this is pure ambrosia. Maple taffy instructions can be found here.

Q: I’ve heard of birch syrup....?
A: Yes, you can also make birch syrup (Also called Alaska syrup) from birch trees in the exact same way as maple syrup. We have not tried this yet but we have planned to tap 10 birch trees for 2013. Birch syrup is apparently clear, and is a bit more delicate and less pronounced in flavour than maple syrup. The big downside to birch syruping is that the sap is fairly low in sugar, so while you need 32 gallons of raw sap to produce a gallon of maple syrup, for birches the ratio is 100 gallons of sap to syrup – a huge difference which triples your collecting and boiling time. But if all you have access to is birches, or if your yard is filled with them, then it is certainly something to consider. Birch sap runs a few weeks before maple sap, as birches are one of the first trees to bloom in springtime.
Q: You said you sometimes tap on civic/provincial land. Have you had any problems with that?
A: Collecting maple sap is considered ‘fair use’ of public land (akin to berrypicking) and has been this way in this land for over 400 years (Aboriginal people first gathered maple syrup over 1,000 years ago, and reduced it down by dropping hot stones into the sap). We were informed by a city worker (St. John's) that sap collecting would not be problematic unless we produced commercially. We were also advised not to tap in designated parks without permission. Of course, it goes without saying that you have an obligation to the trees to tidy up afterwards, and to improve your collecting area, (removal of deadfall branches, etc, clearing out invasive patches of Japanese Knotweed, etc), leaving your grove better than you found it.
Q: I don’t have any maple trees, and I live downtown where there are no trees along the roadsides.
A: Old schoolgrounds, churches, and older, larger properties often have dozens of large trees, many of these are maple trees. Consider approaching a school or a church, for example, and offer them a portion of your harvest from their trees in exchange for permission to tap. Contributions of local maple syrup would make a very popular idea for fundraiser craft sales, etc. At a school, for example, this idea could even involve participation/education with the students!
Q: Health-wise, what is the difference between Aunt Jemima sugar-syrup and my own maple syrup?
- Aunt Jemima ‘Country’ syrup, per 100g: Calories: 256 Carbohydrate: 65g (22% Daily recommended intake) Sodium: 146 mg (6% Daily recommended intake) Added, processed white sugar: 37g
- 100% pure, organic maple syrup, per 100g: Calories: 261 Carbohydrate: 67g (22% Daily recommended intake) Sodium: 0 mg (Yup. Zero.) Natural Sugar: 59g Daily recommended intake of vitamins and minerals by %: Manganese 157%, Zinc 44%, Iron 10%, Calcium 7%, Magnesium 4%, Potassium 4%, Thiamin (B1) 1%, Riboflavin 1%, Niacin 1%, Pantothenic acid 1%
* Based on an expected 2,000 calorie/day diet. So, yes, you’ve been lied to all these years – there IS a form of sugar that is actually good for you (never mind all the exercise you’ll get, going out and visiting your buckets)!